
Page loading time is one of Google’s ranking factors – understanding the different methods to speed up WordPress websites will help to improve said ranking, conversion rate, and overall user experience.
The average page load time on the desktop is 10.3 seconds. However, Google notes that an optimal web page experience requires websites to load in under 2.5 seconds.
This article will explain the ten most effective ways to optimize your WordPress site speed, including tips to maintain fast loading time. In addition, I will also explain why site speed is important and demonstrate how to do a speed test.
1. Pick a Fast WordPress Hosting Plan
Web hosting is a service that helps publish websites online. Hosting influences your WordPress site’s performance, as different plans offer different bandwidth amounts and resources. Understanding your website needs will help to choose a suitable web hosting plan.
Here are some web hosting elements that affect your WordPress performance:
- Uptime – the time your web server is online and running properly. Note that higher uptime means better reliability, so choose a web hosting provider that offers 99.9% annual uptime.
- Server response time – the time it takes for a web browser to receive data from a server and respond to it. A lower response time means a faster server. In fact, Google recommends a server response time of under 200 milliseconds.
- Page speed – the time it takes for a website to load. A lower page speed means a faster web server.
Consider your website’s content size and anticipated traffic before selecting a WordPress hosting provider and plan. Some of the best WordPress hosting providers include:
- Hostinger – offers affordable WordPress hosting plans with great resources, including developer-friendly tools and LiteSpeed Cache. The shared hosting plan for WordPress starts from $1.99/month.
- NameHero – offers a cloud-powered WordPress host with unlimited Solid State Drive (SSD) storage and a free Secure Sockets Layer (SSL) certificate for all plans. The WordPress cloud hosting plan starts from $2.42/month.
- Liquid Web – offers managed WordPress hosting plans with an impressive average loading time. All managed WordPress hosting plans include 15 premium features, starting from $19/month.
One of the ways to analyze how fast your hosting performs is by using a website performance tool, such as Pingdom.
2. Choose a Lightweight WordPress Theme
Other elements that highly influence the WordPress site speed are its theme’s size, mobile responsiveness, and coding. Check out the following criteria to find a fast WordPress theme:
- Lightweight – all JavaScript (JS) and Cascading Style Sheets (CSS) files are under 100 KB. Most default WordPress themes have lightweight files.
- Optimized code – should follow the World Wide Web Consortium (W3C) and WordPress theme development standards.
- Mobile responsiveness – the theme’s design is adaptable to other screens without slowing down the speed. A theme that follows the Accelerated Mobile Pages (AMP) framework is often faster on mobile devices.
Try the demo website first to prevent installing a slow WordPress website theme. Then, use a speed test tool like PageSpeed Insights to check the theme’s performance. Performing a speed test helps determine which theme is better for your WordPress site.
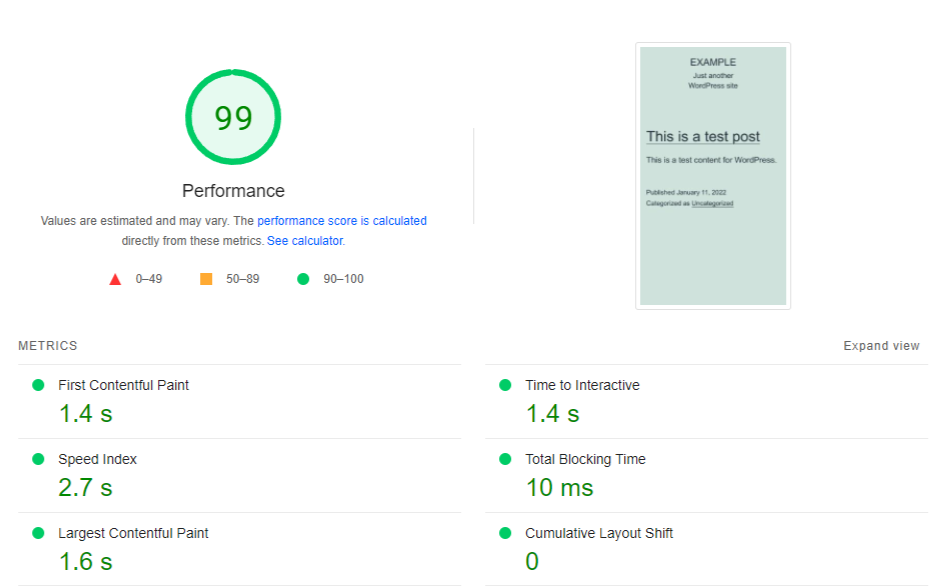
For example, the performance score for a default WordPress theme, Twenty Twenty One, can go up to 99.
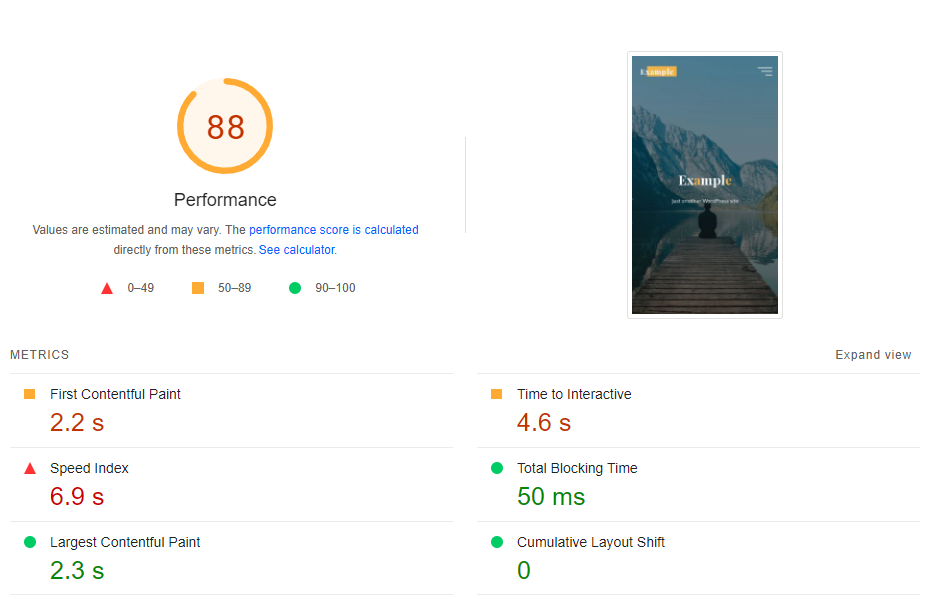
However, the score goes down to 88 on the speed test when using a heavy and slow WordPress website theme like Bravada. There were no changes in content when changing the theme, but Bravada includes more images and animations by default.
Here are some lightweight themes to improve your WordPress site’s performance, which have all scored 99 to 100 on the speed test:
- Neve – comes with a minimalist design that is responsive to different device screens.
- Zakra – uses lightweight code with a fully optimized design for performance.
- Suki – focuses on improving Search Engine Optimization (SEO) with its flexible design.
- GeneratePress – offers a lightweight theme that focuses on speed and usability.
After selecting a lightweight theme, remember to update it regularly to keep a fast WordPress performance.
3. Install a Good WordPress Caching Plugin
A WordPress caching plugin helps create a static HyperText Markup Language (HTML) version of web pages, saved on the hosting server. It can also clear cache automatically after any updates to keep your WordPress site up-to-date.
The caching plugin will display the HTML pages instead of processing the heavier Hypertext Preprocessor (PHP) scripts. Therefore, installing a good WordPress caching plugin minimizes your server load.
Here are some of the best caching plugins to help speed up your WordPress site:
- WP Rocket – offers WordPress caching and minimizes CSS and JavaScript files. WP Rocket is a premium plugin, with pricing plans starting at $49/year for a single website to $249/year for unlimited websites.
- W3 Total Cache – saves up to 80% bandwidth usage with Hypertext Transfer Protocol (HTTP) compressions and AMP support. It can also cache browsers and databases.
- WP Fastest Cache – offers various optimization and caching features, including minifications and SSL support.
Remember to install only one cache plugin at a time to avoid causing errors with your WordPress site.
4. Optimize Images
Images help websites attract visitors and provide visual context to the content. However, having unoptimized images can slow down your WordPress site. For this reason, it is essential to optimize all images in your WordPress media library.
Some of the main ways to optimize images are using the correct image format, compressing to a smaller size, and implementing lazy loading.
Image Format
Image formats can help determine the number of server resources your website needs. Choosing a suitable format helps display high-quality images without occupying too many server resources.
Joint Photographic Experts Group (JPEG) is a great image format for detailed and colorful photographs as this format tends to be smaller in size. On the other hand, Portable Network Graphics (PNG) works better for images with texts because it offers better resolution.
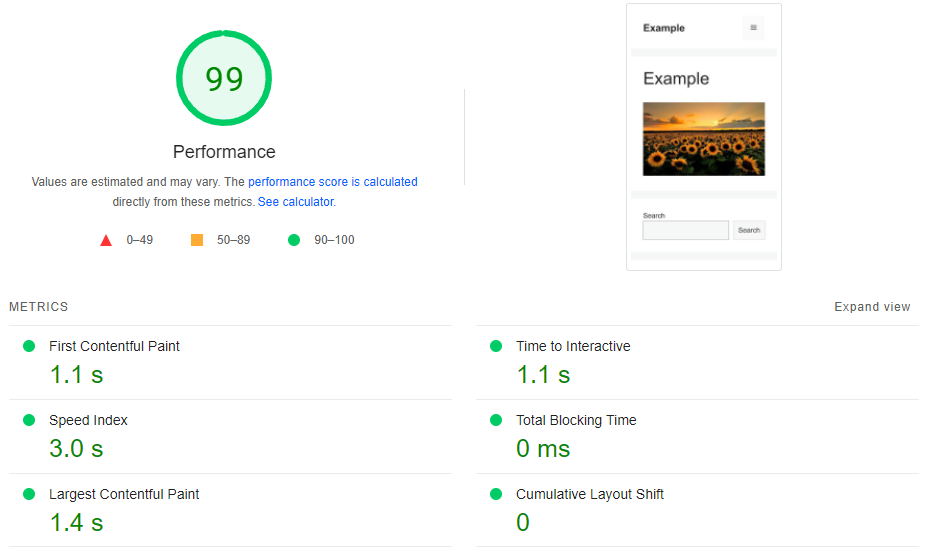
To demonstrate, a web page that includes an image in JPEG format can score 99 on the speed test.
However, the WordPress site’s performance score becomes 85 on the speed test when changing the same image to PNG. There were no other changes in the content except for the image format.
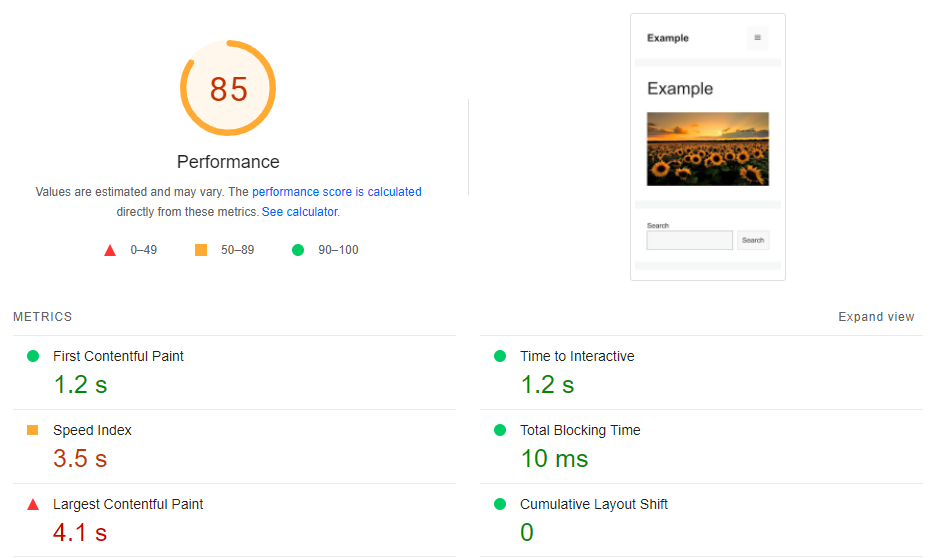
These speed test results show the significant impact that image format has on WordPress speed optimization.
Image Size
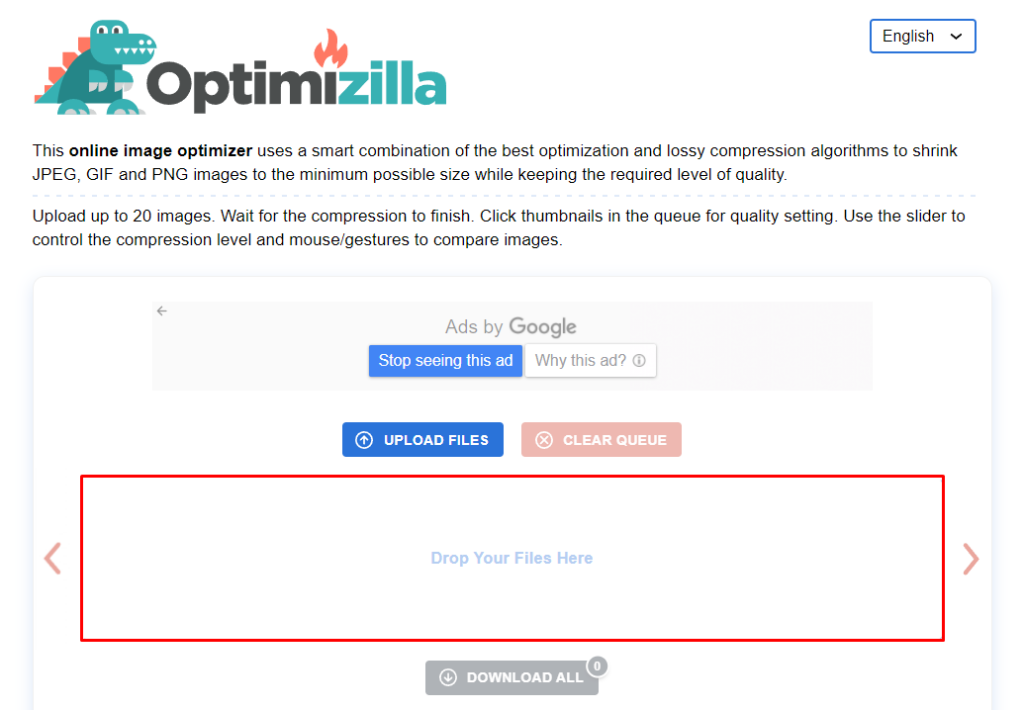
Another essential element of image optimization is its size, as large image sizes can slow down a WordPress site. All images should be under 500KB in size for faster loading time. Optimization tools like Optimizilla can help reduce image sizes while retaining the quality.
With Optimizilla, drop a large image on the rectangle or click on the UPLOAD FILES button to compress using lossy compression.
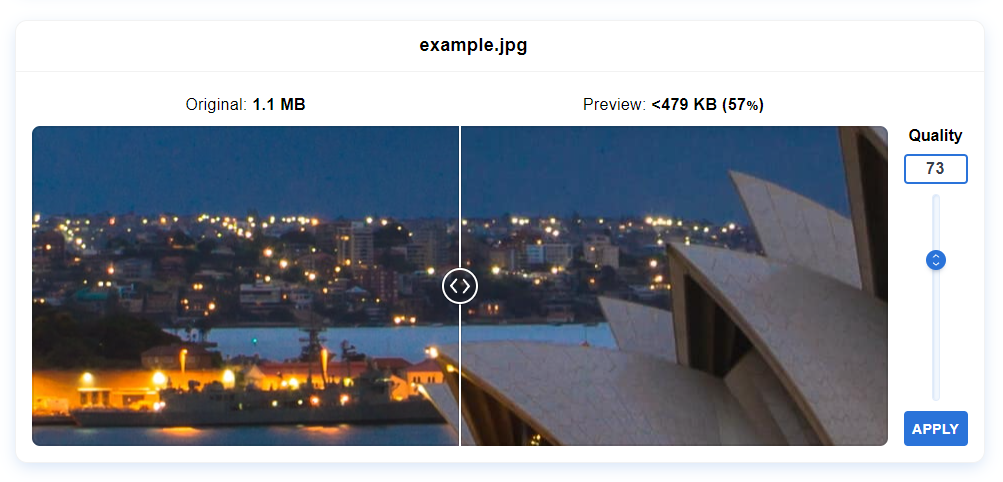
With this online tool, there is an option to determine how much you want to compress by changing the Quality number. It also displays a before and after comparison with the image quality and size.
Resizing high-quality and large images on WordPress will still take up a lot of bandwidth space. Reducing the image size before uploading is a better option than optimizing it on WordPress.
Lazy Loading
The lazy loading technique speeds up a WordPress site by only loading the images currently displayed on the screen from the visitor’s perspective. Therefore, when users access your WordPress site, all the images that do not appear on the screen will use placeholders instead.
When you lazy load images, you save data, resources, and processing time, as your website avoids having to load images that visitors do not see.
One of the ways to implement lazy loading to your WordPress site is by adding a loading attribute on your <img> element. The following attribute will instruct browsers to defer loading images that are not on the screen:
<img src="photo.jpg" loading="lazy">
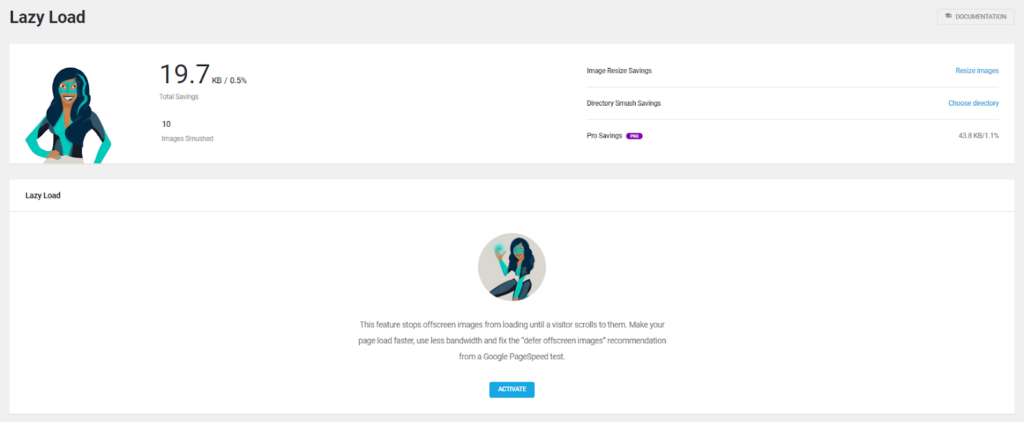
Instead of adding the attribute manually, use a WordPress plugin like Smush. Head to the WordPress admin dashboard and select Smush -> Lazy Load to use this technique. Click on the Activate button to start including lazy load images.
5. Make Use of Content Delivery Network
A Content Delivery Network (CDN) is a group of servers located at a variety of sites around the world in order to provide content faster globally. It is a great way to speed up WordPress sites with global target audiences.
With a CDN, the data center stores your website’s static content in its cache. Therefore, the server closest to your visitor’s location will be the one loading your content. A CDN can reduce the number of external HTTP requests, which helps to improve latency.
Two types of CDN that can help speed up WordPress sites are:
- Traditional Pull – caches a copy of all content and media, but visitor’s requests still go directly to the hosting provider. KeyCDN is a popular example of a traditional pull content delivery network.
- Reverse Proxy – intercepts all incoming requests and acts as an intermediary server between visitors and your hosting. So, make sure to point your Domain Name System (DNS) to the CDN provider. An example of a reverse proxy CDN is Cloudflare.
Once you have selected a suitable CDN, create an account and integrate it with your website. To demonstrate, here are the steps to configure Cloudflare for your WordPress site:
- Log into your account and click on the Add a Site button. Enter your site’s domain name to start.

- Select a Cloudflare plan or choose the free version. Cloudflare will then show your DNS records to check for anything to add or remove.
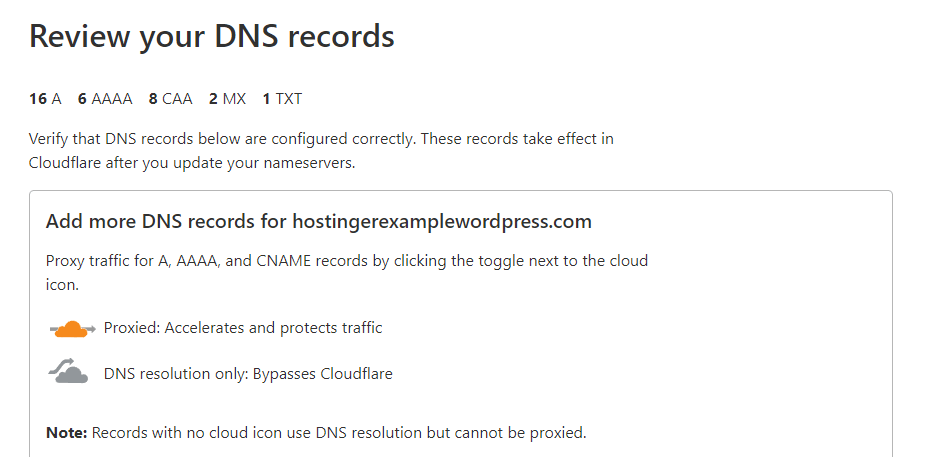
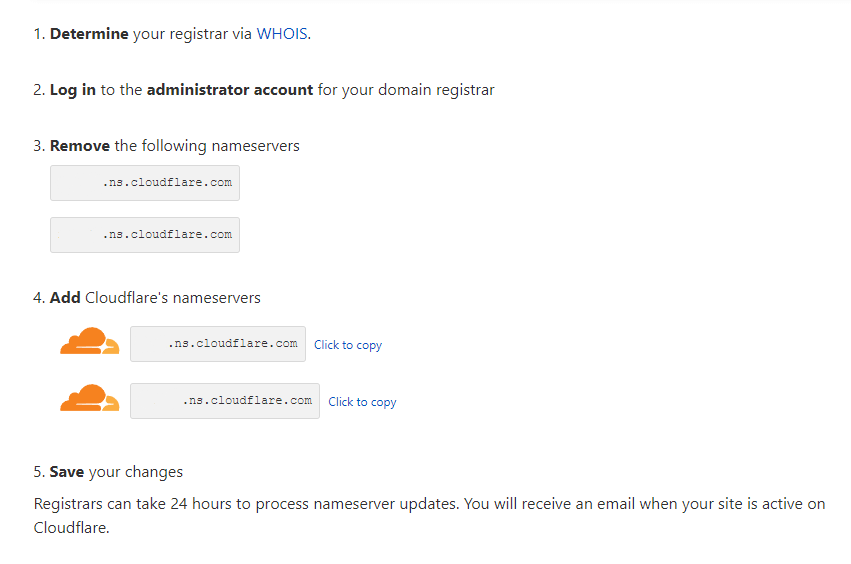
- Remove the listed nameservers on your site’s DNS and replace them with Cloudflare’s nameservers listed on your Overview page. Wait up to 24 hours to process the changes before you continue.
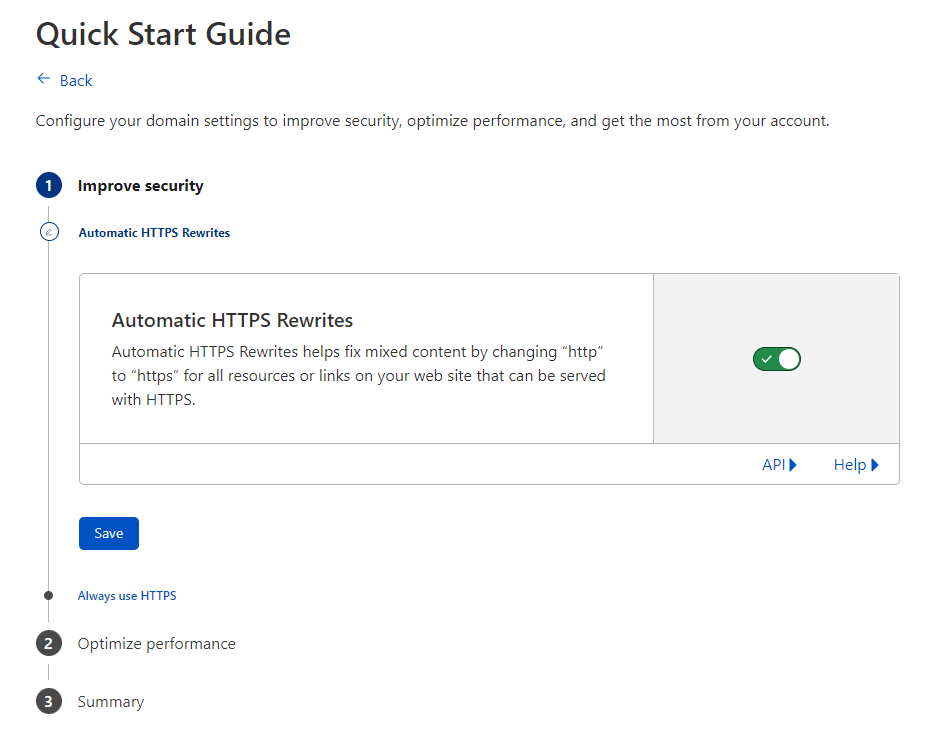
- There is an option to follow the Quick Start Guide configurations to optimize your CDN better. However, click Finish later if you do not want to configure certain elements right away.
6. Remove Unused and Outdated WordPress Plugins
WordPress plugins extend a site’s functionalities and features. However, plugins can also add weight to your WordPress site’s database queries and file size. Too many plugins will slow down your site’s load time.
Remove a few plugins that are unused and outdated to make your WordPress site load faster. Remember that deactivating those plugins is not enough to speed up your WordPress website. Make sure that you delete the unused plugins’ files.
If your WordPress site is on shared hosting, keep the number of your plugins under ten to prevent slowing down your site.
Some hosting providers offer a shortcut to remove unused and outdated plugins on their control panel. However, it is also possible to delete these plugins using your WordPress admin dashboard.
Head to Plugins -> Installed Plugins and select the one you want to remove. If the plugin is already deactivated, click on Delete. However, if the plugin is still active, click on Deactivate first and then Delete.
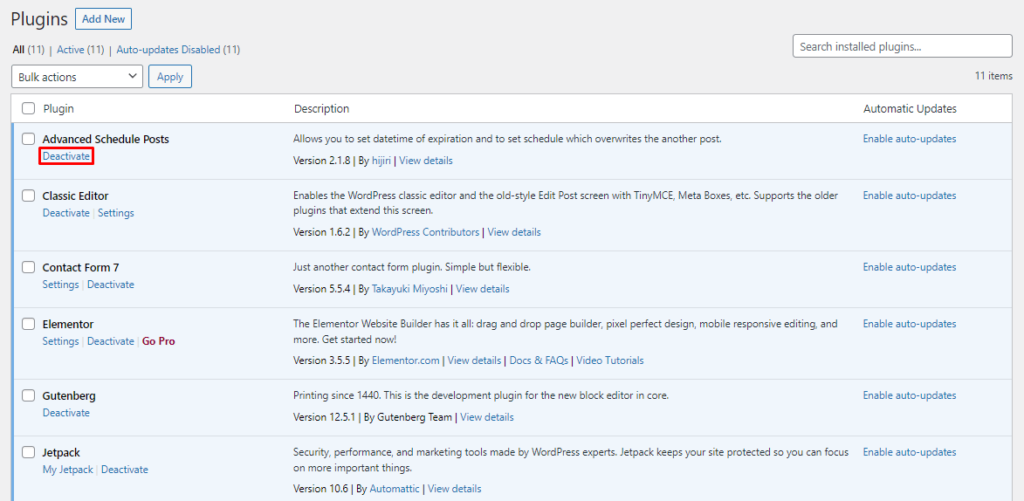
Another option to remove unused and outdated WordPress plugins is using your file manager. Each plugin has a folder inside your domain’s public_html. Access these folders from wp-content -> plugins and delete them manually.
7. Paginate the Comments Section
Receiving comments on your posts showcases a good level of visitor engagement. However, comments increase server load and can slow down your WordPress site. So, another WordPress speed optimization method is to paginate your comments section.
This method helps to speed up your WordPress site by breaking the comment section into pages. A shorter page length reduces the overall loading time and improves readability.
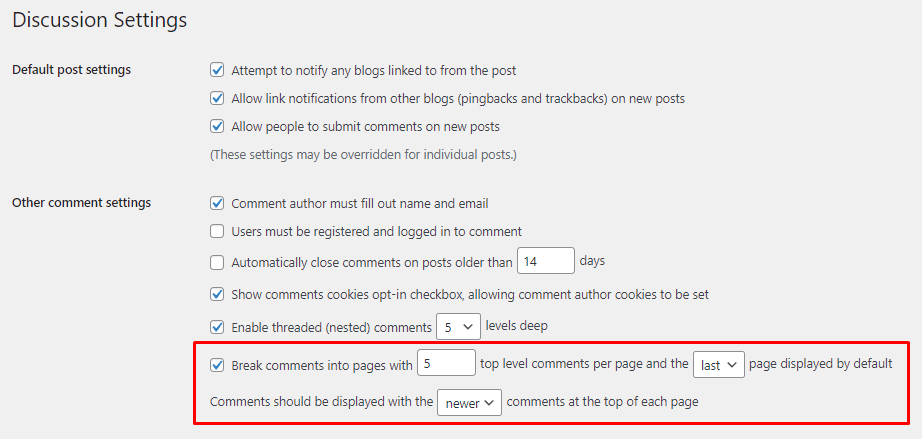
WordPress has a built-in setting to paginate your comments section. Head to Dashboard -> Settings -> Discussion and check the box next to Break comments into pages. Select how many comments you want on a page and which comments should be on top.
There are three areas for you to make decisions on: the number of top-level comments per page, the page displayed by default, and the type of comments at the top of each page.
To prevent search engines from marking comment pagination as duplicate content, point them to your page’s canonical Uniform Resource Locator (URL). A simple way to do this is by using an SEO plugin like All in One SEO.
8. Minify JS and CSS Files
A CSS or JavaScript file can include unnecessary spacing, line breaks, and external scripts that slow down your WordPress site. These characters increase file size and create additional network traffic.
Minify JavaScript and CSS files by removing these unnecessary characters. The minified versions will offer the same functionality without using as much bandwidth. This method helps to speed up data transfers between servers and browsers.
Instead of manually removing unnecessary characters to optimize JavaScript and CSS delivery, use an online tool or a plugin. Note to create backups before minifying any files.
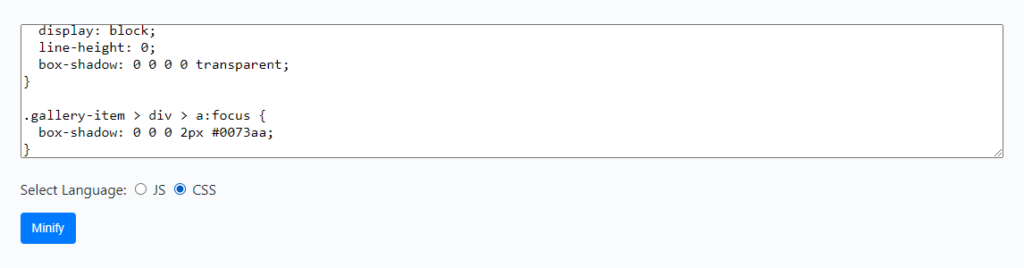
For example, Minifier can minify your web page’s JavaScript or CSS files in less than five minutes. To demonstrate, here are the steps to optimize CSS delivery for your website:
- Copy the code in a CSS file, often inside your WordPress theme folders. For this example, let’s use the style.css file of my theme. Then, paste the code on Minifier and select CSS for the language. Click Minify to continue.
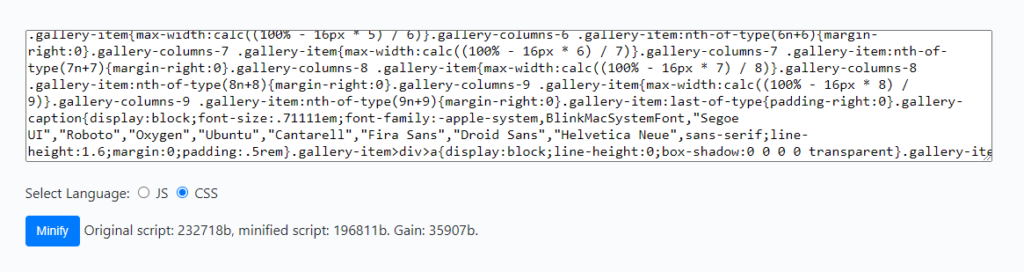
- The tool will load CSS code and remove all unnecessary characters. It also shows the amount of file size reduced during the process. Copy the custom CSS version and replace the original file with it. Click Save and do it again with other files.
Another option is to use a plugin to minify CSS and JavaScripts files. Plugins like WP Rocket offer tools to help minify and even combine CSS. In addition, this plugin can also help you eliminate render-blocking resources to improve your Core Web Vitals performance.
9. Update PHP
PHP is a server-side scripting language that developers use to create dynamic and interactive websites. WordPress core files mainly use PHP. This open-source scripting language has a new version every year. Updating PHP regularly helps to improve your website’s security and performance.
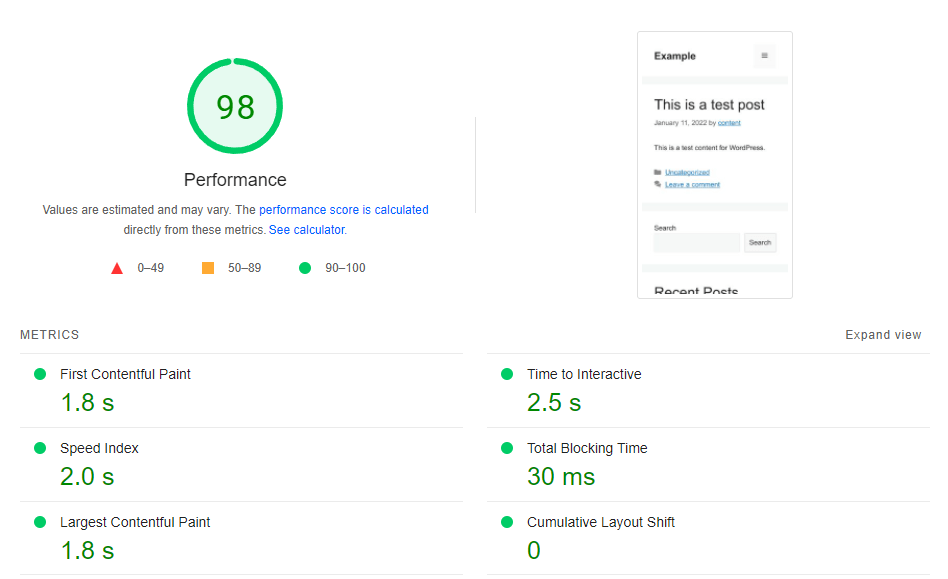
The recommended version is anything above PHP 7.4, which processes faster. To demonstrate, the speed test result for a website using PHP 5.6 is 92.
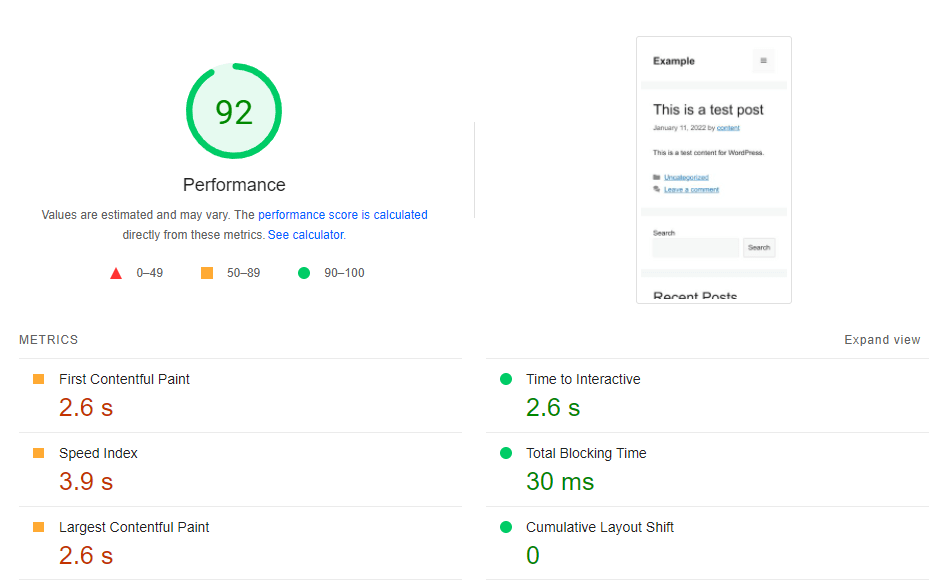
Without changing any content, the score went up to 98 after updating the PHP version to PHP 8.0.
The PHP version of your website is available on your WordPress admin dashboard under Tools -> Site Health -> Info. There, select the Server section and look for the PHP version.
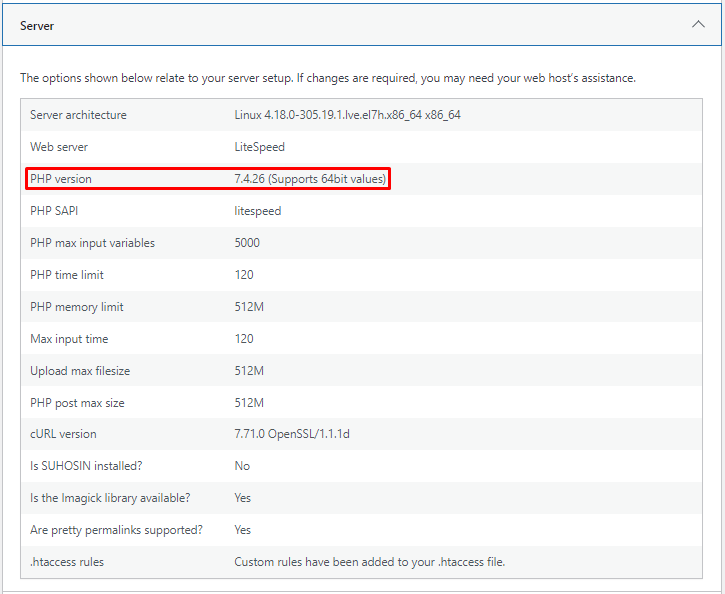
The steps to update your PHP version depends on your hosting provider. Most will have a PHP configuration tool on the control panel to help with your update.
10. Improve WordPress Database
A WordPress database stores information about every change that happens with your website.
However, unnecessary data in a database can slow down a WordPress site as servers will take longer to retrieve specific information.
Optimizing your database using phpMyAdmin, cleaning up unwanted data, and limiting revisions will help speed up WordPress.
Use phpMyAdmin
phpMyAdmin is open-source software that manages databases, tables, columns, indexes, users, and permissions. Its built-in feature includes optimizing your site’s database. Here are the steps to improve your WordPress database using phpMyAdmin:
- Access your phpMyAdmin account from your hosting provider. Click on the home icon and select the Databases section.
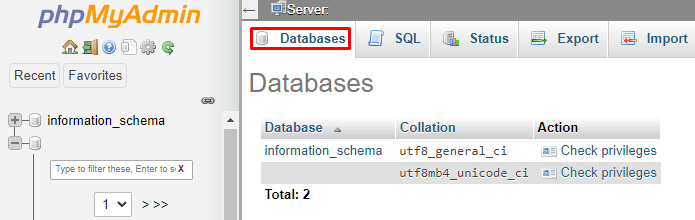
- Choose the database to optimize and scroll down until you find the Check all box. Click on the box and select Optimize table next to it to continue.
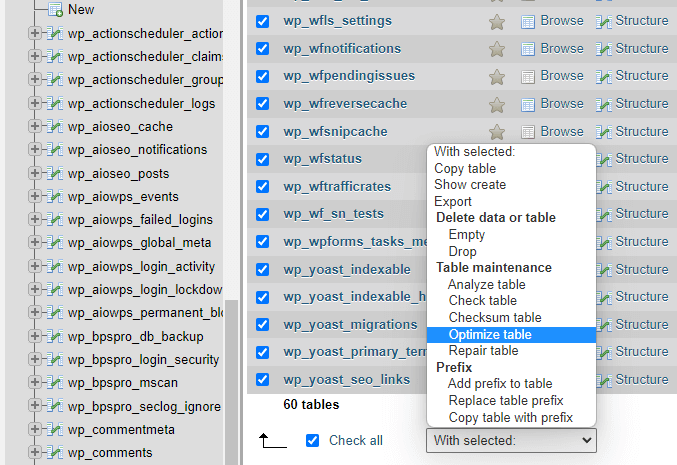
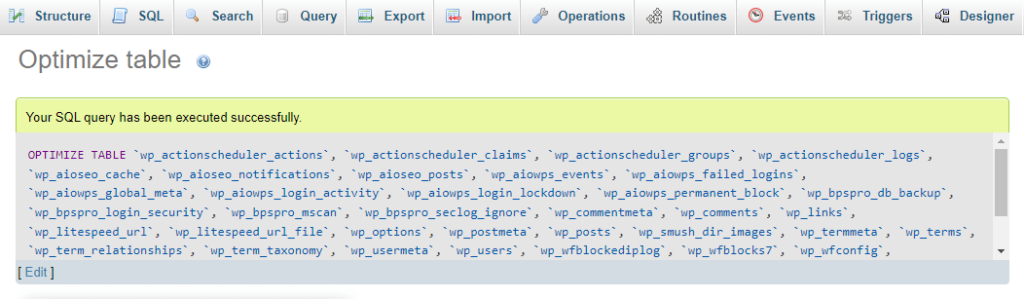
phpMyAdmin will show that Your SQL query has been executed successfully to show that you have optimized your database.
Clean up Unwanted Data
Another method to improve WordPress databases is to clean up unnecessary data, such as drafts when editing a post or unapproved comments. Tools like Google Search Console or the WP-Optimize plugin can help simplify this cleanup.
To demonstrate, follow these steps to clean up unwanted data using WP-Optimize:
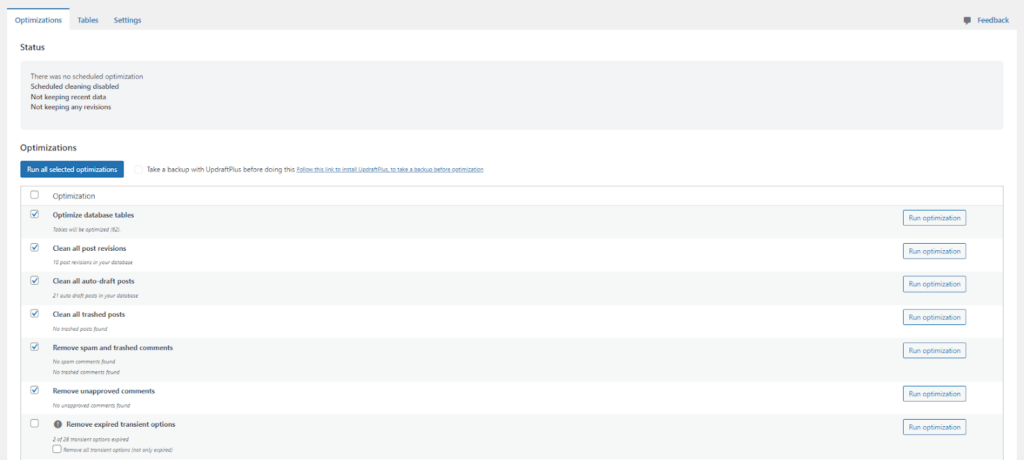
- Head to WP-Optimize -> Database -> Optimizations and select the elements to optimize. Here is a brief explanation for each database item:
- Database tables – there are 11 tables by default on a new WordPress site, with every table storing specific data.
- Post revisions – include changes in a post.
- Auto-draft posts – when WordPress users edit a post, automatic drafts are saved with every change.
- Trashed posts – include all deleted posts.
- Spam and trashed comments – include comments marked as spam or deleted.
- Unapproved comments – blog comments that you have not approved.
- Expired transient options – unused cache data, such as social sharing plugins that store share counts on pages or posts.
- Pingbacks and trackbacks – notifies blogs when you link them.
- Post meta data – remove information shown to users on each post that does not belong to any post.
- Comment meta data – remove comment information that does not belong to any post.
- Orphaned relationship data – plugins create this data when WordPress users delete a post.
Once you select the database item, click on Run all selected optimizations.
Limit Page and Post Revisions
WordPress stores revisions by default even after making small changes on your post or page. These revisions increase your database size and slow down your WordPress site. One of the ways to speed up WordPress again is by limiting your post and page revisions.
Limiting revisions help to keep your workload lighter and faster.
The first step to limit revisions is by accessing your wp-config.php file in your file manager. Make sure to back up the file before making changes. Then, insert the following code above the line with ABSPATH:
define('WP_POST_REVISIONS', 10)
The number ten is the limit that you have set for your revisions. Set this number according to how often you need to revise a post or page.
Other than limiting revisions, there is also an option to change the time for autosave intervals. For example, autosave your edits every five minutes instead of one. Add the following code above the post revisions line to edit your autosave interval:
define('AUTOSAVE_INTERVAL’, 300); // seconds
The number 300 here corresponds to the number of seconds for your autosave interval, for you to change accordingly.
Save your wp-config.php file and upload it back to your server.
Another option to save resources on your database is to disable revisions completely. This option can only work with evergreen content that you do not want to change. Include the following code instead of the line above to disable revisions:
define('WP_POST_REVISIONS', false)
With this setting, there will only be one revision per post. Plugins are also available to help with this method, such as WP Revisions Control.
How Important Is Speed for WordPress?
Having a fast site loading speed is essential to user experience and rankings. Some of the advantages of optimizing your WordPress site speed are:
- Reduce bounce rate – websites with a faster loading time will have lower bounce rates as visitors can access content without waiting long. When a page load time increases from one to three seconds, the bounce probability increases by 32%.
- Increase SEO ranking – page speed is a ranking factor for Google, so faster websites rank better on search engine results pages.
- Improve Core Web Vitals report – monitoring your core web vitals helps optimize overall performance.
- Higher conversion rate – websites with better performance have higher conversion rates. Research shows that pages with a loading time above 5.7 seconds have a conversion rate of 0.6%, whereas pages that load in 2.4 seconds have an average conversion rate of 1.9%.
- Better navigation between pages – with an overall improvement in user experience, visitors are also more likely to visit more pages on your website. By doing so, visitors stay longer on your site and learn more about your brand.
How to Do a Speed Test for a WordPress Site
Having learned the methods to speed up your WordPress website, monitoring your site speed is essential. Speed tests help point out your current site speed and ways to improve it. However, knowing the efficient testing method and key metrics is necessary to get meaningful results.
Here are some top speed test tools to choose from:
- GTmetrix – includes performance and structure grades, core web vitals, a waterfall report, various server locations, and recommendations to improve performance. It has a free version and offers GTmetrix pricing plans starting from $10.67/month.
- Page Speed Insight – shows a core web vitals assessment, a treemap report, and file diagnostics. This tool is entirely free.
- Pingdom – offers uptime and performance monitoring, as well as various server locations for a better end-user experience. The limited feature version is available for free, and the Pingdom pricing plans start at $10/month.
- Uptrends – includes a comprehensive report on your website performance with active monitoring and alerting. This tool does not have a free version, and the Uptrends pricing plans start at $16.21/month.
One of the methods to test your website performance is by using multiple tools and getting an average number from the results. It is essential to use tools that will show the same metrics for this method.
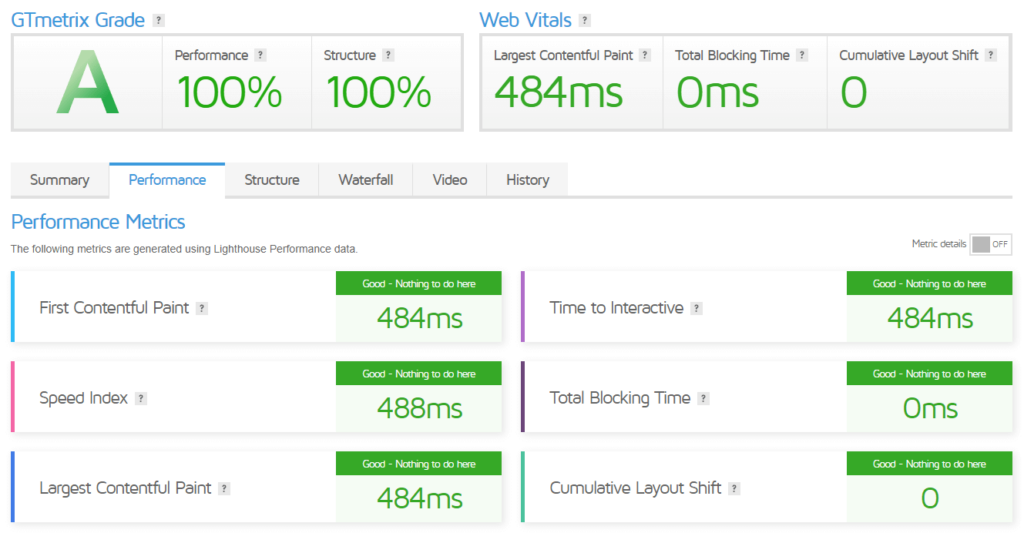
To demonstrate, the result of a website speed test using GTmetrix shows a 100% performance grade, with 488 milliseconds for the speed index.
However, the same website shows a 97 performance score using PageSpeed Insights, with 1.5 seconds for the speed index.
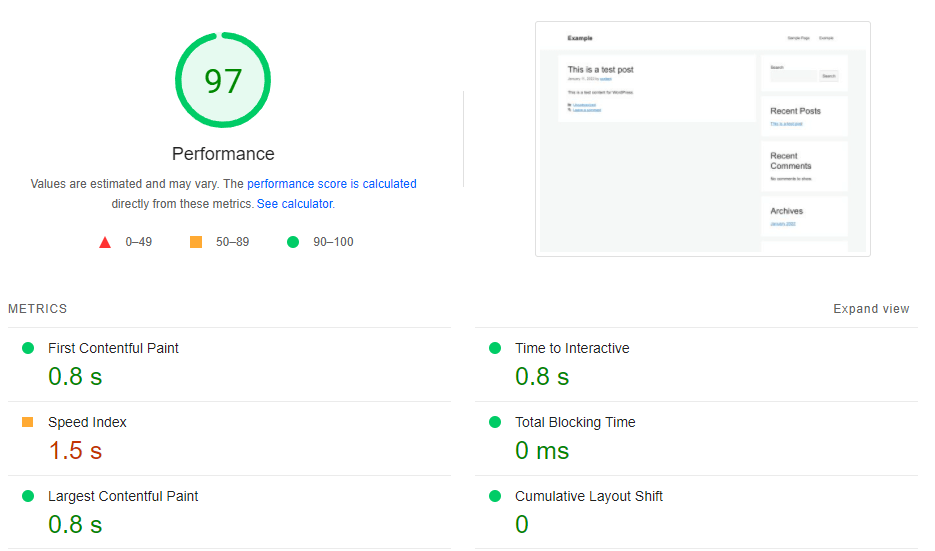
The tests were taken simultaneously but showed different results. So, use the average number from two or more tests to monitor accurately.
Another testing method that can provide useful information for WordPress performance monitoring is testing out different locations. Use Google Analytics to find your most prominent visitor demographic. Then, run the test using the location for your highest traffic source.
This method helps to keep your website optimized for your largest demographic. Another option is to test the location of your target audience and compare the two.
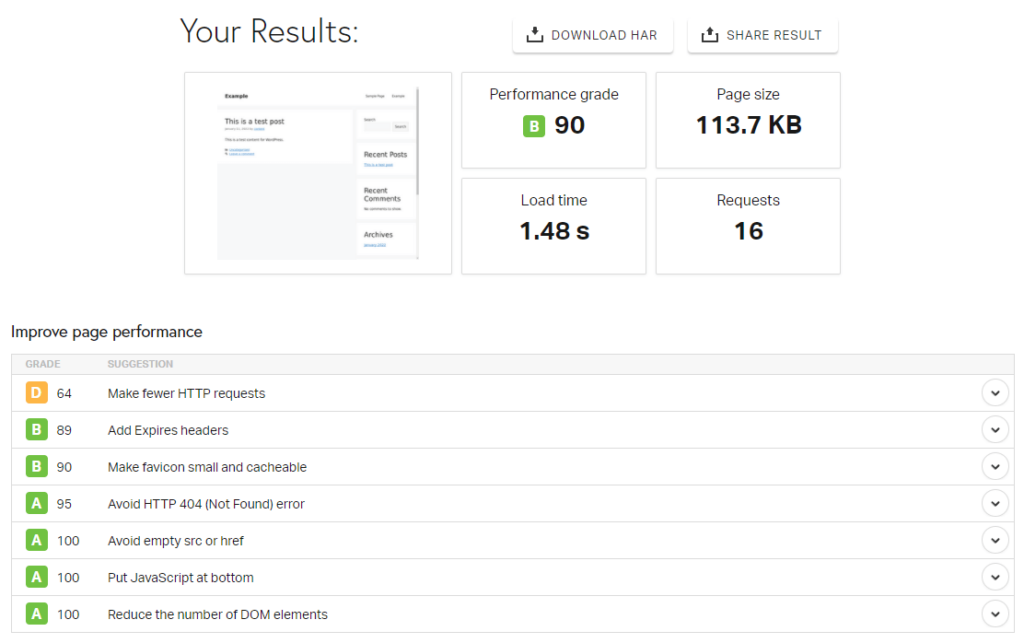
I will demonstrate how to do a speed test using Pingdom, which allows you to change the testing location. The first step is to insert the URL and change the location under Test from.
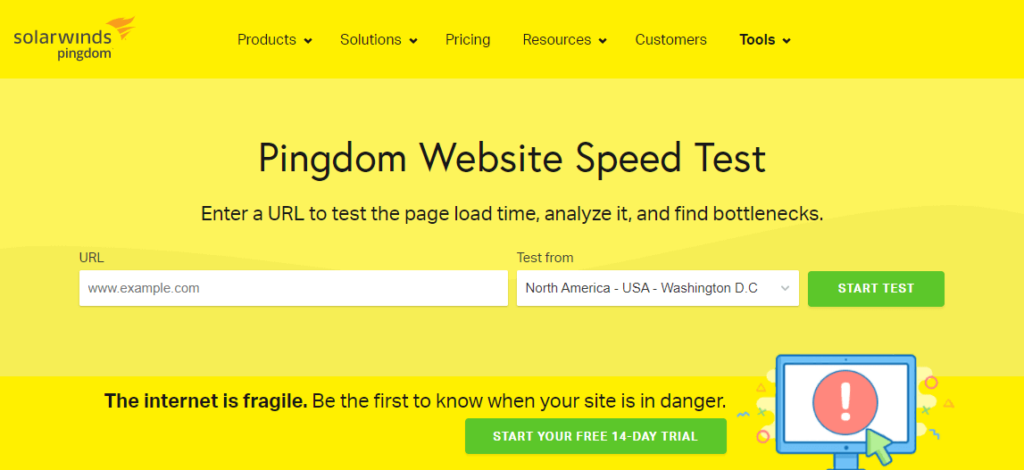
This example shows a website performance grade of 90 with 1.48 seconds of load time when using San Fransisco as the location. The tool also shows the different ways to improve page performance.
The same website shows a 92 performance grade in Japan, with 2.19 seconds load time.
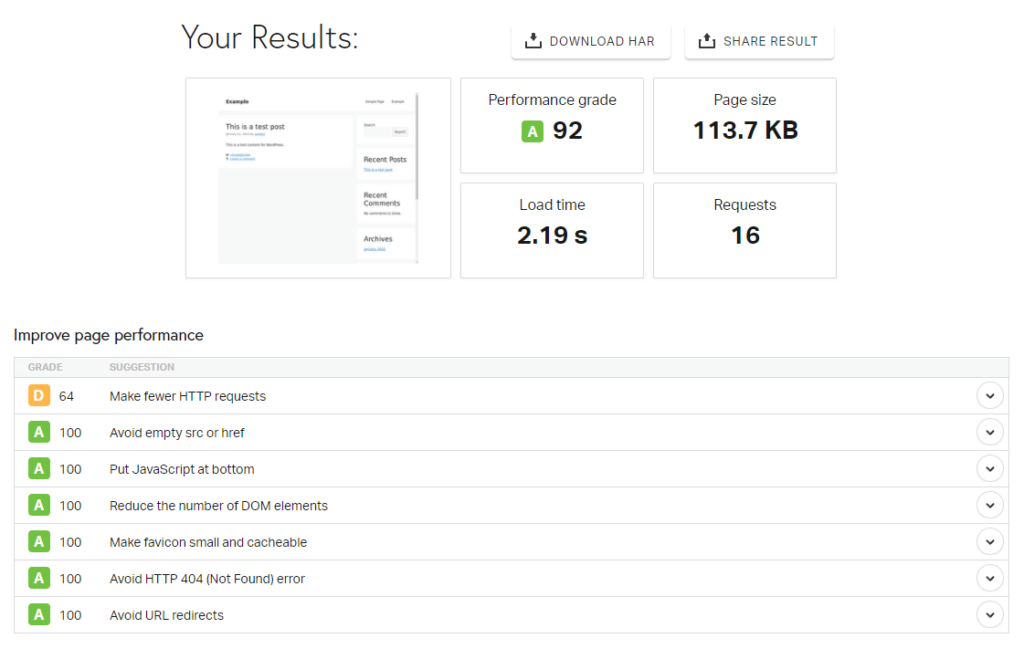
This comparison shows that the website speed is not equal in different locations. Using CDN will help with this issue, especially for websites with global audiences.
When performing a speed test, take note of these metrics:
- Largest Contentful Paint (LCP) – measures loading performance, with the recommended time under 2.5 seconds of when the page starts loading. This metric is part of core web vitals.
- Cumulative Layout Shift (CLS) – measures visual stability, looking at the movement of visible elements on the screen. Core web vitals recommend that CLS should be 0.1 or less.
- First Input Delay (FID) – measures the time from when a user first interacts with your page to the time browser responds to it. As part of core web vitals, the recommended FID should be 100 milliseconds or less.
- First Contentful Paint (FCP) – measures how long it takes for a browser to render the first piece of Document Object Model (DOM) content after a user navigates to your website.
- Time to Interactive (TTI) – the amount of time it takes for a page to become fully interactive.
- Speed index – shows how fast it takes for content to become visibly populated.
- Total blocking time – measures the total time a page gets blocked from responding to user input, including clicks and screen taps.
Using Google Search Console and Google Analytics can help monitor your WordPress site’s performance better.
Conclusion
WordPress site speed is essential to user experience, SEO, and conversions. Here are ten methods to make sure your WordPress site loads faster:
- Pick a fast hosting plan – look for hosting with 99.9% uptime and server response time under 200 milliseconds.
- Choose a lightweight theme – use a theme that has optimized code and is mobile-responsive.
- Install a good caching plugin – minimize server load by showing the HTML version of your static pages instead of their PHP scripts.
- Optimize images – use JPEG for photos and PNG for images with writings, compress files to under 500KB, and lazy load your images.
- Make use of CDN – for websites with global target audiences, the data center helps your site achieve the same speed anywhere in the world.
- Remove unused and outdated plugins – avoid slow loading by removing any plugins that you no longer need.
- Paginate the comment sections – separate the comment sections into different pages.
- Minify CSS and JS files – remove any unnecessary code from CSS and JavaScript files.
- Update PHP – make sure to use the newest version or at least PHP 7.4.
- Improve WordPress database – optimize tables using phpMyAdmin, clean up unwanted data, and limit revisions.
After implementing these methods to speed up your WordPress website, conduct a regular speed test to monitor your performance. Avoid having a slow website by comparing different tools and using various locations when performing speed tests.
Good luck with improving your WordPress performance!